


Photo by Hal Gatewood on Unsplash
Turbocharge Your Nest.js App with Interceptors
Unlock Advanced Functionality in your APIs


Introduction
Hey everyone! Welcome back to a brand new blog post around Nest.js. In today's episode, we're going to cover the concept of interceptors and how they can be beneficial. After a short introduction, we'll be looking at a real-world scenario where we will use an interceptor to solve the problem. To be precise, there will be two solutions. But more on that later!
So, I'm sure you're as excited as me. Let's dive in!
Interceptors in general
Generally speaking, an interceptor is a mechanism that is being used to manipulate incoming requests and/or outgoing responses. With the help of an interceptor, you can do different things like adding additional functionality, modifying data, or performing different tasks such as authentication, logging, caching, error handling or data transformation.
An interceptor hooks into the request/response pipeline. If you'd like to do something with the incoming request before it's passed to your route handler, it will be your friend. On the other side, if there's something to do with the response before it's sent to the client, an interceptor can help you with that.
Another great benefit is that it adds extra functionality to your API endpoints without modifying their core logic. Furthermore, you can share common logic across your endpoints well, which is encapsulated in an interceptor.
Why you should care
Using interceptors is a valuable tool in API development and there are several reasons why you should care about them.
Modularity and Separation of Concerns
Interceptors help you separate concerns from the core logic of your API endpoints. By encapsulating functionality such as authentication, logging, or error handling in interceptors, you can keep your endpoint code focused on its primary responsibility. This promotes modularity, improves code organization, and makes your codebase easier to maintain and understand.
Code Reusability
They allow you to reuse common functionality across multiple API endpoints. Instead of duplicating code or implementing the same logic in multiple places, you can define interceptors once and apply them to specific endpoints or groups of endpoints. This saves development time, reduces the chances of errors, and promotes consistency throughout your API.
Security
Interceptors can play a crucial role in enforcing security measures. For example, you can use interceptors to handle authentication and authorization by checking request headers or tokens before allowing access to certain endpoints. Interceptors also enable you to implement rate limiting, input validation, or data sanitization to protect your API against malicious or malformed requests.
Logging and Monitoring
Using interceptors can also be an excellent tool for logging and monitoring API requests and responses. You can capture important information such as timestamps, request parameters, headers, and response statuses. By logging this data, you gain insights into how your API is being used, identify potential issues or bottlenecks, and troubleshoot problems when they occur.
Data Transformation
Most commonly they're used to transform request or response data as it passes through the API pipeline. For example, you might use an interceptor to convert data between different formats (e.g., JSON to XML) or to apply data validation or normalization. This flexibility allows you to adapt the API data to the specific needs of the client or to ensure consistency across different API versions.
Caching and Performance Optimization
They can also integrate with caching mechanisms to improve API performance. By intercepting requests and responses, you can implement caching strategies to store and serve frequently accessed data. This reduces the load on your server, improves response times, and enhances the scalability of your API.
As you've seen, interceptors can be a powerful and flexible way to extend or customize the behavior of your API. They also cover a lot of different use cases, that vary between the different web frameworks out there.
Let's see how interceptors are being used in Nest.js by looking at a real-world scenario.
Real-world scenario
Overview
Let's imagine we've got an API that is responsible for handling CRUD operations around users. No matter what specific operation is performed, we're returning our user entity instances that are stored inside our database a lot. For example, if we want to find a specific user by its id, create a new user, update one or get a list of users based on specific criteria like age.
To handle the communication between our application and our database we make use of TypeORM which can be treated as our UsersRepository. If you're not familiar with TypeORM that's no problem right here. Just see it as a component or layer that is responsible for interacting with our database for every different CRUD operation. It helps us to trigger database actions like finding a user by its id and receiving the result of it as well.
We have already defined our user entity like the following:
// src/users/user.entity.ts

import { Entity, Column, PrimaryGeneratedColumn } from 'typeorm';

@Entity()
export class User {
    @PrimaryGeneratedColumn()
    id: number;

    @Column()
    email: string;

    @Column()
    password: string;

    @Column()
    age: number;

    @Column()
    address: string;
}
Without touching anything on the entity, a response for finding a user by its id would look like this:
{
    id: 2312,
    email: "user@example.com",
    password: "c8b5b638d56fde5a9ba5fd890f8488c2e47a05f155245e4e9e5e6d6e1b42e6f3",
    age: 33,
    address: "Some Street 1"
}
The Problem
Although the password is hashed, it's really bad to send the password of the user to the client because it introduces a big risk that the passwords of our users can be stolen. So we want to remove the password field from our response. Furthermore, there are some specific requirements that we also shouldn't expose the user's age and address.
That sounds like a good way to make use of an interceptor, right?
There are two solutions to incorporate an interceptor that handles this kind of use case.
The first one will be the one that is described inside the official Nest docs, which is very straightforward.
But I'll show you a potential problem with that solution and will introduce you to a second one that involves a bit more coding, but will help you to understand an interceptor on a much deeper level.
One important step before our solution
Before we dive in, let's visualize what we want to achieve:
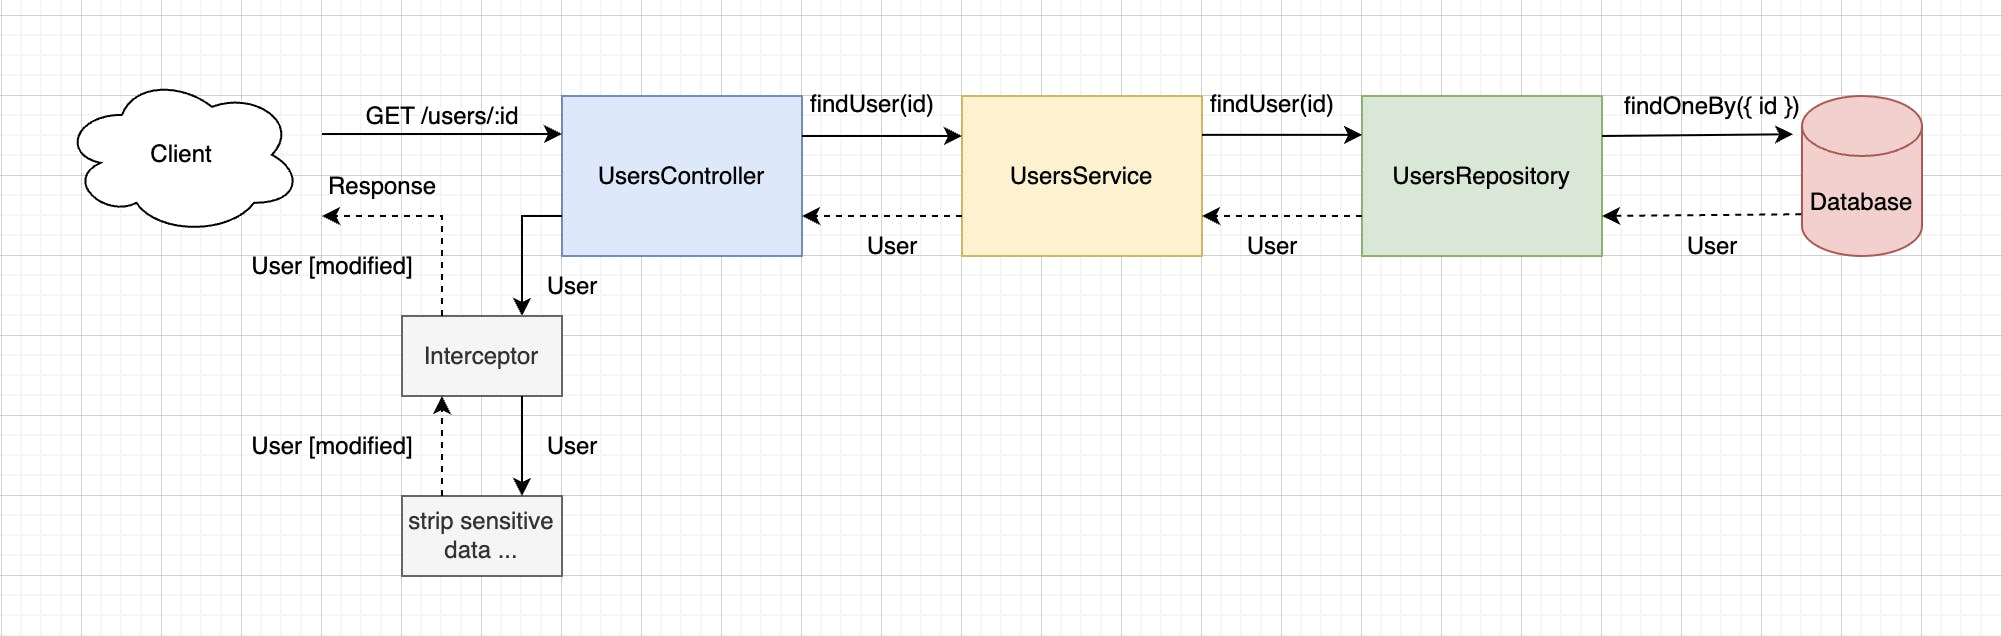
When we receive a request to find a user by its id we pass this request through and trigger the different functionalities in our different layers.
We then receive the full user entity instance from our database that is passed through to our controller.
But instead of returning the whole entity instance as a response, we will create an interceptor that is hooked right before the response is being sent and modify the user entity to not contain the specified fields.
Right now our UsersController looks like this
// src/users/users.controller.ts

import {
    Body,
    Controller,
    Post,
    Get,
    Patch,
    Delete,
    Param,
    Query,
    NotFoundException,
} from '@nestjs/common';
import { UsersService } from './users.service';
import { CreateUserDto } from './dtos/create-user.dto';
import { UpdateUserDto } from './dtos/update-user.dto';

@Controller('users')
export class UsersController {
    constructor(private readonly usersService: UsersService) {}

    @Post()
    createUser(@Body() body: CreateUserDto) {
        const { email, password } = body;
        return this.usersService.createUser(email, password);
    }

    @Get('/:id')
    async findOneById(@Param('id') id: string) {
        const idAsNumber = parseInt(id);
        const user = await this.usersService.findOneById(idAsNumber);

        if (!user) {
            throw new NotFoundException(`User with id ${id} not found.`);
        }

        return user;
    }

    @Patch('/:id')
    updateUser(@Param('id') id: string, @Body() body: UpdateUserDto) {
        const idAsNumber = parseInt(id);
        return this.usersService.updateUser(idAsNumber, body);
    }

    @Delete('/:id')
        removeUser(@Param('id') id: string) {
        const idAsNumber = parseInt(id);
        return this.usersService.removeUser(idAsNumber);
    }
}
Pretty straightforward, right? We've got four route handlers, each responsible for a different operation. In all cases, we're returning whatever comes back from our UsersService without modifying it.
So, let's take a closer look at our service layer:
import { Injectable, NotFoundException } from '@nestjs/common';
import { Repository } from 'typeorm';
import { InjectRepository } from '@nestjs/typeorm';
import { User } from './users.entity';

@Injectable()
export class UsersService {
    constructor(
        @InjectRepository(User) private readonly usersRepository: Repository<User>,
    ) {}

    async createUser(email: string, password: string) {
        const newUser = this.usersRepository.create({ email, password });
        return await this.usersRepository.save(newUser);
    }

    async findOneById(id: number) {
        return await this.usersRepository.findOneBy({ id });
    }

    async updateUser(id: number, attributes: Partial<Omit<User, 'id'>>) {
        const user = await this.usersRepository.findOneBy({ id });

        if (!user) {
            throw new NotFoundException(`User with id ${id} not found.`);
        }

        Object.assign(user, attributes);

        return await this.usersRepository.save(user);
    }

    async removeUser(id: number) {
        const user = await this.usersRepository.findOneBy({ id });

        if (!user) {
            throw new NotFoundException(`User with id ${id} not found.`);
        }

        return this.usersRepository.remove(user);
    }
}
Here you can see the different methods we call on TypeORM to interact with our database. We don't touch the data that is coming back and just return it from each method.
Now it's time to work on our solution to get this whole thing running properly and don't expose the sensitive fields anymore!
Solution #1
This is the recommended way from the Nest.js docs.
STEP 1: Adjust the user entity to exclude the individual fields Change the user entity from:
// src/users/user.entity.ts

import { Entity, Column, PrimaryGeneratedColumn } from 'typeorm';

@Entity()
export class User {
    @PrimaryGeneratedColumn()
    id: number;

    @Column()
    email: string;

    @Column()
    password: string;

    @Column()
    age: number;

    @Column()
    address: string;
}
to the following:
// src/users/user.entity.ts

import { Entity, Column, PrimaryGeneratedColumn } from 'typeorm';
// Import 'Exclude' decorator from the 'class-transformer' package
import { Exclude } from 'class-transformer';

@Entity()
export class User {
    @PrimaryGeneratedColumn()
    id: number;

    @Column()
    email: string;

    @Column()
    // Annotate the 'password' property to be excluded
    @Exclude()
    password: string;

    @Column()
    // Annotate the 'age' property to be excluded
    @Exclude()
    age: number;

    @Column()
    // Annotate the 'address' property to be excluded
    @Exclude()
    address: string;
}
We have imported the Exclude decorator from the class-transformer package that lets us annotate the properties we'd like to exclude from the user entity when it's getting returned in our response.
STEP 2: Use the built-in serialization interceptor on the route handler We can make use of any interceptor by using the UseInterceptors decorator from Nest.js and pass in the individual interceptor class. In our case, this will be the ClassSerializerInterceptor is also already built into Nest.js.
A quick side note on the process of serialization. The docs state it perfectly:
Serialization is a process that happens before objects are returned in a network response. This is an appropriate place to provide rules for transforming and sanitizing the data to be returned to the client. For example, sensitive data like passwords should always be excluded from the response. Or, certain properties might require additional transformation, such as sending only a subset of properties of an entity. Performing these transformations manually can be tedious and error-prone, and can leave you uncertain that all cases have been covered.
I like the last sentence because it would be the most obvious strategy, right? Some of you might think Why aren't we deleting the properties in the service layer by hand? I'd done it also for a long time before I understood the concept of interceptors, which gave me hard times because I wasn't sure if I'd removed the data in every case. And for such sensitive data like passwords you probably don't want to be uncertain. Furthermore, the usage of interceptors in Nest.js is pretty straightforward and often saves you time. So why not use it?
With that in mind let's change our UsersController from:
// src/users/users.controller.ts

import {
    Body,
    Controller,
    Post,
    Get,
    Patch,
    Delete,
    Param,
    Query,
    NotFoundException,
} from '@nestjs/common';
import { UsersService } from './users.service';
import { CreateUserDto } from './dtos/create-user.dto';
import { UpdateUserDto } from './dtos/update-user.dto';

@Controller('users')
export class UsersController {
    constructor(private readonly usersService: UsersService) {}

    @Post()
    createUser(@Body() body: CreateUserDto) {
        const { email, password } = body;
        return this.usersService.createUser(email, password);
    }

    @Get('/:id')
    async findOneById(@Param('id') id: string) {
        const idAsNumber = parseInt(id);
        const user = await this.usersService.findOneById(idAsNumber);

        if (!user) {
            throw new NotFoundException(`User with id ${id} not found.`);
        }

        return user;
    }

    @Patch('/:id')
    updateUser(@Param('id') id: string, @Body() body: UpdateUserDto) {
        const idAsNumber = parseInt(id);
        return this.usersService.updateUser(idAsNumber, body);
    }

    @Delete('/:id')
        removeUser(@Param('id') id: string) {
        const idAsNumber = parseInt(id);
        return this.usersService.removeUser(idAsNumber);
    }
}
into this:
// src/users/users.controller.ts

import {
    Body,
    Controller,
    Post,
    Get,
    Patch,
    Delete,
    Param,
    Query,
    NotFoundException,
    // Import 'UseInterceptors' decorator
    UseInterceptors,
    // Import 'ClassSerializerInterceptor'
    ClassSerializerInterceptor
} from '@nestjs/common';
import { UsersService } from './users.service';
import { CreateUserDto } from './dtos/create-user.dto';
import { UpdateUserDto } from './dtos/update-user.dto';

@Controller('users')
export class UsersController {
    constructor(private readonly usersService: UsersService) {}

    @Post()
    createUser(@Body() body: CreateUserDto) {
        const { email, password } = body;
        return this.usersService.createUser(email, password);
    }

    // Annotate the 'findOneById' route handler with the decorator using the interceptor
    @UseInterceptors(ClassSerializerInterceptor)
    @Get('/:id')
    async findOneById(@Param('id') id: string) {
        const idAsNumber = parseInt(id);
        const user = await this.usersService.findOneById(idAsNumber);

        if (!user) {
            throw new NotFoundException(`User with id ${id} not found.`);
        }

        return user;
    }

    @Patch('/:id')
    updateUser(@Param('id') id: string, @Body() body: UpdateUserDto) {
        const idAsNumber = parseInt(id);
        return this.usersService.updateUser(idAsNumber, body);
    }

    @Delete('/:id')
        removeUser(@Param('id') id: string) {
        const idAsNumber = parseInt(id);
        return this.usersService.removeUser(idAsNumber);
    }
}
First, we've imported the decorator UseInterceptors and the interceptor class ClassSerializerInterceptor from the @nestjs/common package.
After that, we annotated the findOneById method to use the mentioned interceptor. Inside of @UseInterceptors you can pass any interceptor class, even those you've written on your own.
If we now send a GET request to /users/2312 and there is a user with that id, we'll receive the following response:
{
    id: 2312,
    email: "user@example.com"
}
Et voila! We've successfully excluded the individual fields from our response.
But if we send a request to the other endpoints, we still receive the user with all those fields included. That's because we've just annotated the findOneById endpoint to use the interceptor.
To make it work for all methods inside that controller we simply add @UseInterceptors(ClassSerializerInterceptor) to the whole controller class.
This would look like this:
// src/users/users.controller.ts

import {
    Body,
    Controller,
    Post,
    Get,
    Patch,
    Delete,
    Param,
    Query,
    NotFoundException,
    UseInterceptors,
    ClassSerializerInterceptor
} from '@nestjs/common';
import { UsersService } from './users.service';
import { CreateUserDto } from './dtos/create-user.dto';
import { UpdateUserDto } from './dtos/update-user.dto';

// Annotate the whole class to intercept all route handlers
@UseInterceptors(ClassSerializerInterceptor)
@Controller('users')
export class UsersController {
    constructor(private readonly usersService: UsersService) {}

    // ... methods
}
Now all our sensitive fields will be stripped away from all responses inside our UsersController.
Solution #2
The solution from above works perfectly in most cases. But I'd like to show you another case where this approach isn't the best and where we need to write our custom interceptor. By writing it, you'll also get a better understanding of what an interceptor in Nest.js is made of.
Let's imagine we've got two different user roles, Admin and User. While our users with the User role should only receive the id and email field, we want our users with the Admin role to receive more data.
So there's a conflict because we want to alter the user entity instance based on a specific role.
To accomplish this we will do the following:
Create another endpoint for admin users
/admin/users/:idto receive a specific user by its idWrite our interceptor for serialization that receives a DTO with instructions on which fields to remove and which to keep
Use our custom interceptor inside the
UseInterceptorsdecorator and annotate the different route handlers with that
To make it crystal clear, let's take a look at the following graphic:

We will create a new controller called AdminController that's responsible for all our admin routes. Of course, there should be also authentication and authorization guards involved before, but this would exceed the scope of this blog post here. We'll take a look at this topic in another blog post.
After that, the whole flow is the same as in solution number one. We will call the findUser method from our UsersService that will trigger our UsersRepository to find a user by the specific id (or not).
In both controllers we receive the same looking instance of our user entity with all possible fields included a user can have. But as specified above we'd like to send a different-looking response from each controller. That's where our custom interceptor will come into play.
Let's get into it!
STEP 1: New AdminController
First of all, we create a new AdminModule with a new AdminController inside of it. For this post, I skip the generating process of all that and show you the shape of our AdminController.
// src/admin/admin.controller.ts

import { Controller, Get, NotFoundException, Param } from '@nestjs/common';
import { UsersService } from 'src/users/users.service';

@Controller('admin')
export class AdminController {
    constructor(private readonly usersService: UsersService) {}

    @Get('users/:id')
    async findUserById(@Param('id') id: string) {
        const idAsNumber = parseInt(id);
        const user = await this.usersService.findOneById(idAsNumber);

        if (!user) {
            throw new NotFoundException(`User with id ${id} not found.`);
        }

        return user;
    }

    // ... other methods
}
As you can see, we've injected the UsersService into our controller here. To make this injection work, you should also add the UserService class to the imports array inside the AdminModule.
STEP 2: Create DTOs
If you're not familiar with a DTO, it's a Data Transfer Object which is used to transfer data from one component to another. Most commonly it's used in Nest.js to validate an incoming request body, but it's not limited to that. We'll make use of it as well to define all properties in our user entity instance we'd like to send with the response.
Let's start with defining our DTO for a user with the role User:
// src/users/dtos/user.dto.ts

import { Expose } from 'class-transformer';

export class UserDto {
    @Expose()
    id: number;

    @Expose()
    email: string;
}
Do you see the new decorator Expose we're using here? The approach in this solution is different from solution one, where we've used Exclude. While in solution one we annotated all properties we want to exclude from our response, we simply define just the properties we want to expose. In our case, it's just the id and email property. Every other property that is not listed and annotated here, will NOT be included in our response.
With that in mind let's define the DTO for a user with the role of Admin:
// src/admin/dtos/user.dto.ts

import { Expose } from 'class-transformer';

export class AdminUserDto {
    @Expose()
    id: number;

    @Expose()
    email: string;

    @Expose()
    age: number;

    @Expose()
    address: string;
}
Here define and annotate all properties we'd like to expose.
STEP 3: Write a custom interceptor
The setup is done. Now it's time to get our hands dirty and dive into the world of writing our custom interceptor in Nest.js.
We'll do this step by step. First of all, we create the basic shape:
// src/interceptors/serialize.interceptor.ts

import { NestInterceptor, ExecutionContext, CallHandler } from '@nestjs/common';
import { Observable } from 'rxjs';

export class SerializeInterceptor implements NestInterceptor {
    intercept(context: ExecutionContext, next: CallHandler<any>): Observable<any> | Promise<Observable<any>> {
        // ... interceptor logic
    }
}
We create and export a new class and define its name following the naming conventions. First, we specify the name of the class and after that the type of class, which in our case is Interceptor. After that, we implement the built-in NestInterceptor interface.
To make this implementation work we need to define an intercept method that handles our logic for our interceptor. It receives the context and the next function. The context stores information about the incoming request and the next function returns information about the response stream of the specific route handler.
With that in mind, we can hook into the request and the response by doing the following:
// src/interceptors/serialize.interceptor.ts

import { NestInterceptor, ExecutionContext, CallHandler } from '@nestjs/common';
import { Observable } from 'rxjs';
import { map } from 'rxjs/operators';

export class SerializeInterceptor implements NestInterceptor {
    intercept(context: ExecutionContext, next: CallHandler<any>): Observable<any> | Promise<Observable<any>> {
        // Logic before the REQUEST is passed to our controller methods
        // "context" holds request information
        console.log('I run before being passed to the controller', context);

        return next.handle().pipe(
            map((data: any) => {
                // Logic before the RESPONSE is sent to the client
                // "data" holds our response data
                console.log('I run before being sent to the the client', data);
            }),
        );
    }
}
As you can see, everything that lives within the map function of our return method gets executed right before our response is sent out. The concept of pipe, map and Observables are part of rxjs. If you're not familiar with it, don't sweat it. It's okay for now to remember that you have to set up certain logic inside that map function to add functionality to our response before it's sent to the client. The stuff that's stored in data is the actual data that's returned from the individual route handler.
Everything else that lives around our return statement will be executed right before the request is passed to the controller.
Since we want to alter our response, adding logic to our map function is the right place:
// src/interceptors/serialize.interceptor.ts

import { NestInterceptor, ExecutionContext, CallHandler } from '@nestjs/common';
import { Observable } from 'rxjs';
import { map } from 'rxjs/operators';
import { ClassConstructor, plainToClass } from 'class-transformer';

export class SerializeInterceptor implements NestInterceptor {
    constructor(private readonly dto: ClassConstructor<any>) {}

    intercept(context: ExecutionContext, next: CallHandler<any>): Observable<any> | Promise<Observable<any>> {
        return next.handle().pipe(
            map((data: any) => {
                return plainToClass(this.dto, data, {
                    excludeExtraneousValues: true,
                });
            }),
        );
    }
}
Remember that our goal is to expose only specific properties from our user entity instance based on the individual use case before it's sent to the client. The instructions on which properties to expose are handled inside our DTOs. To make our interceptor dynamic we've specified a constructor that receives the individual DTO.
From our map method, we return the result of the plainToClass function from the class-transformer package. This is the place where all the magic happens. It takes in our individual DTO, the data that is returned from our controller and a little configuration object where we specify to exclude extraneous values. Especially that option will make our whole concept work because it excludes all properties we don't have annotated with the Expose decorator in our DTO.
STEP 4: Use the custom interceptor inside our controllers
Wow! After we've written our custom interceptor, we're able now to use it inside our controllers.
// src/users/users.controller.ts

import {
    Body,
    Controller,
    Post,
    Get,
    Patch,
    Delete,
    Param,
    Query,
    NotFoundException,
    UseInterceptors
} from '@nestjs/common';
import { UsersService } from './users.service';
import { CreateUserDto } from './dtos/create-user.dto';
import { UpdateUserDto } from './dtos/update-user.dto';
import { SerializeInterceptor } from 'src/interceptors/serialize.interceptor';
import { UserDto } from './dtos/user.dto';

// Use custom interceptor that takes in the 'UserDto'
@UseInterceptors(new SerializeInterceptor(UserDto))
@Controller('users')
export class UsersController {
    constructor(private readonly usersService: UsersService) {}

    // ... methods
}
Inside our UsersController we imported the SerializeInterceptor we've written and our UserDto. By just using it like any other interceptor before we passed it to the UseInterceptors decorator and we're done.
// src/admin/admin.controller.ts

import { Controller, Get, NotFoundException, Param } from '@nestjs/common';
import { UsersService } from 'src/users/users.service';
import { SerializeInterceptor } from 'src/interceptors/serialize.interceptor';
import { AdminUserDto } from './dtos/user.dto';

@Controller('admin')
export class AdminController {
    constructor(private readonly usersService: UsersService) {}

    // Annotate the 'findUserById' our custom interceptor that takes in the 'AdminUserDto'
    @UseInterceptors(new SerializeInterceptor(AdminUserDto))
    @Get('users/:id')
    async findUserById(@Param('id') id: string) {
        const idAsNumber = parseInt(id);
        const user = await this.usersService.findOneById(idAsNumber);

        if (!user) {
            throw new NotFoundException(`User with id ${id} not found.`);
        }

        return user;
    }

    // ... other methods
}
The same goes for our AdminController. I've decided to use the decorator just on our findUserById method and NOT the whole controller because it may hold route handlers of other endpoints that return different data or entity instances.
After we've written all that stuff, we're now very flexible to serialize our responses. As the API and its requirements are going to grow, we can define a new DTO for each use case and pass it to our custom interceptor. We can decide if we want it to be serialized for a whole controller class or just for single route handlers.
It will save us time, effort and headaches, will be less error-prone and will give us the certainty that we didn't miss any endpoint.
Conclusion
As you've seen interceptors are a great way to do certain operations on the request or response of your endpoints. It's also pretty straightforward to make use of them in Nest.js. But they're not specific for Nest.js.
Other libraries like axios (Node.js http client) offer also interceptors to hook into the request and response to add specific logging or data transformation for example.
Although you don't need them all the time, I think every seasoned developer should be aware of when and how to use them properly to make the API better.
See you next time and stay tuned!